What is DNS?
DNS (Domain Name System) is a system that names computers and network services and is organized in a hierarchy.
TCP/IP networks, such as the Internet, use DNS to locate computers and services through more human-friendly names that can be remembered, since it would be impossible to remember all the IP numbers that access websites.
If DNS didn’t exist, we would have to invent it, or the Internet wouldn’t exist the way it is. That’s because we’re talking about IPv4 for now. But what about IPv6? Note that a simple MAC address (in hexadecimal) is already quite difficult for us to quickly remember. We definitely need DNS.
How it works:
When a client computer sends the name of a remote host to a DNS server, the server responds with the corresponding IP address. The client computer can then send messages directly to the IP address of the remote host, once it has associated its name with its IP address.
If the DNS server does not have an entry in its database for the remote host, it may respond to the client with the address of a DNS server that is likely to have more information about the remote host, or it may query another DNS server.
This process may occur recursively until the client computer receives the IP address or receives the response that the queried name does not belong to a specific host.
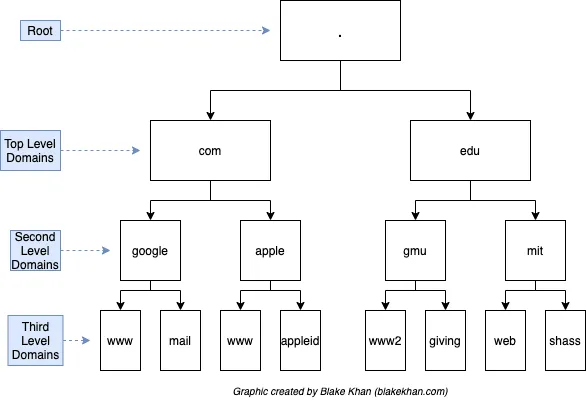 note. levels of domains that DNS provides
Setting up a DNS server is an important part of providing any service on the Internet. Thus, as in the case of “.google, which is a subordinate domain of “.com”, the user can freely create subdomains according to their needs.
The name of a domain must be delegated by a responsible organization called “Domain Name Registrars”. It is up to this organization to create and maintain the domains, which entails an annual monetary fee, which may vary according to the additional functionalities desired by the client.
Security
DNS is also a target for attacks, such as DNS spoofing or DNS cache poisoning, where an attacker tricks your computer into visiting a fake website instead of the real one.
This is why secure DNS practices and services like DNSSEC (DNS Security Extensions) have been developed to protect against such threats.
In essence, DNS is the system that makes browsing the web as simple as typing a name, taking care of all the technical details so you can get where you want to go.
Configuration with Bind9
BIND is a DNS service software package, used as the default in Linux. It has an open source license and is developed by the Internet Software Consortium (ISC).
There is no problem in installing it on the same server where the Apache HTTP Server and other resources were installed, although from a security standpoint, it is best to use separate servers; or, perform a chroot operation, in which BIND is executed in a different directory, without access to the system files.
To install BIND on Ubuntu, simply do so through the package manager. It is recommended to install version 9 of BIND, as it is the current version. On Ubuntu 20.04 or later, install it with the following command:
sudo apt install bind9If BIND is installed on a local server, the other stations must be configured to use the server’s IP address as the primary DNS, allowing them to browse normally, without using the provider’s DNS.
This configuration is standard for BIND, in which it assumes the role of a DNS cache server, sending requests to the Root servers and returning the information to the clients, without any intervention. Therefore, it is necessary to configure BIND so that it can respond for your domains, assuming the role of an active DNS server.
The file to be configured is:
/etc/bind/named.conf.localIn this file we insert new resolvers. But first, let’s check the contents of the /etc/bind/named.conf.default-zones file, as we have some important default zones pre-configured.
# /etc/bind/named.conf.default-zones
 zone "." {
 type hint;
 file "/usr/share/dns/root.hints";
 };
 zone "localhost" {
 type master;
 file "/etc/bind/db.local";
 };
 zone "127.in-addr.arpa" {
 type master;
 file "/etc/bind/db.127";
 };
 zone "0.in-addr.arpa" {
 type master;
 file "/etc/bind/db.0";
 };
zone "255.in-addr.arpa" {
 type master;
 file "/etc/bind/db.255";
 };
All of these zones are pre-configured in the system and can be found in /etc/bind/named.conf.default-zones.
If no zone has been established by the user, the /etc/bind/named.conf.local file will be empty or with some pre-configuration.
For example, to restart BIND, simply type:
sudo systemctl restart bind9To check the status of the system, use the command:
sudo systemctl status bind9For more details on configuring DNS servers using BIND, there are several tutorials on the Internet such as BIND website.